Is Your Pricing Structure Working? How to Re-evaluate and Optimize for Success

Is Your Pricing Structure Working? How to Re-evaluate and Optimize for Success

In any business, pricing plays a pivotal role in determining profitability, competitiveness, and customer satisfaction. Yet, many fitness studios, wellness centers, and small businesses often overlook the need to periodically reassess their pricing structure. If you’re struggling with low conversions, unprofitable pricing, or not seeing the revenue growth you’d expect, it’s time to re-evaluate your pricing model.

This blog will walk you through the process of reassessing and optimizing your pricing structure to ensure that it’s aligned with your business goals, customers’ expectations, and industry standards. We’ll break down common pricing pitfalls, offer effective strategies to boost profits, and provide actionable tips for setting a price structure that drives success.

Section 1: Why Your Pricing Structure May Not Be Working

Common Signs That Your Pricing is Off

A lot of businesses don’t realize they have a pricing issue until they notice certain red flags. If you’ve experienced any of the following, your pricing structure may need an overhaul:

  • Declining Profit Margins: If you’re not making as much money as expected, or your margins are shrinking, it’s a sign that your pricing may be too low.
  • Increased Customer Complaints: If your customers are consistently questioning your pricing or complaining about cost, it could mean that your pricing doesn’t reflect the value they perceive.
  • High Churn Rates: If customers are leaving after a short period of time or after using a service only once, your prices may be too high for the perceived value.
  • Difficulty Attracting New Customers: A high customer acquisition cost or stagnation in growth may signal that your pricing is either too steep or not competitive enough in comparison to others in the market.

Understanding these signs is the first step toward fixing any issues with your pricing.

Section 2: The Benefits of Re-evaluating Your Pricing Structure

Why Re-evaluating Pricing is Crucial

Re-evaluating your pricing structure can lead to improved business outcomes. Here are the key benefits:

  • Increased Profit Margins: By adjusting your pricing to reflect market demand and business costs, you can increase your profit margins.
  • Attract the Right Customers: A well-defined pricing structure can help you attract and retain customers who see your services as valuable, making them more likely to stay longer.
  • Better Cash Flow: When you optimize your pricing, you ensure steady cash flow, reducing the strain on your business operations and allowing for more strategic growth.
  • Competitiveness in the Market: Pricing should reflect the value you provide and also remain competitive within your industry. Re-evaluating ensures that you stay relevant.

Ultimately, the right pricing strategy enables you to remain profitable while delivering high-quality service and value to your customers.

Featured image

Section 3: How to Re-evaluate Your Pricing Structure

Step 1: Assess Your Current Pricing

Start by thoroughly assessing your current pricing structure. Review the following:

  • Costs of Operations: Are your prices covering the cost of providing services, including fixed costs (rent, utilities) and variable costs (equipment, staff wages)?
  • Competitor Pricing: How do your prices compare to your competitors? Are you in line with the market or overpriced/underpriced?
  • Customer Expectations: Have you surveyed your customers to understand what they are willing to pay for the services you offer? Are you pricing services in a way that aligns with customer expectations?

Ultimately, the right pricing strategy enables you to remain profitable while delivering high-quality service and value to your customers.

Step 2: Understand Your Target Market

Knowing your target audience is essential when setting the right price. Consider the following:

  • Demographics: Who are your customers? What’s their income level? Do they value quality over price, or are they more cost-sensitive?
  • Buying Behavior: What influences their purchasing decisions? Do they prioritize convenience, prestige, or affordability?
  • Market Trends: What are current trends in your industry that could affect pricing? For instance, if you’re running a yoga studio, the rise of online classes may mean you need to adjust pricing for in-person and virtual sessions.

By understanding your audience better, you’ll have a clearer sense of the pricing that aligns with their values and expectations.

Featured image

Step 3: Evaluate Your Pricing Models

There are several pricing models to choose from depending on your business type. Here are a few options:

  • Flat Rate Pricing: A set price for a particular service or product (e.g., membership or package deals).
  • Tiered Pricing: Offering different levels of services at various price points, allowing customers to choose based on their needs and budget.
  • Pay-As-You-Go Pricing: Customers pay for each individual session or class. This works well for businesses that offer drop-in services.
  • Freemium Pricing: Offering a free trial period or basic service, with paid upgrades for premium features.
  • Discounts and Promotions: Offering seasonal or volume-based discounts for long-term commitments.

Consider experimenting with these models to see which one resonates best with your customers and aligns with your business goals.

Step 4: Factor in Value, Not Just Cost

Your pricing should reflect the value you’re offering. If you’ve been solely focused on the cost to run your business, you may be missing out on pricing opportunities based on perceived value. For example:

  • High-Quality Experience: If your services offer a premium experience (exclusive classes, personalized attention), your pricing should reflect that premium service.
  • Unique Selling Proposition (USP): Do you have something unique about your business, such as specialized equipment, unique instructors, or a loyalty program? Ensure your pricing accounts for these factors.

Customers are more likely to accept higher prices if they perceive your offerings as unique and valuable.

Section 4: How to Optimize Your Pricing Strategy

Step 5: Experiment with Pricing Models

Once you’ve reviewed your existing model and understood the market, experiment with new pricing strategies. Here are some ideas:

  • Offer Value-Based Pricing: Instead of just focusing on the costs of providing services, consider the value your customers perceive. Adjusting pricing based on perceived value can improve both customer satisfaction and profits.
  • Test Different Packages and Discounts: Try bundling services into packages or offering discounts for memberships and long-term contracts.
  • Implement Dynamic Pricing: For services that can fluctuate in demand, like group fitness classes, consider dynamic pricing. For example, you could increase the price of classes during peak times and reduce them during off-peak hours.

A/B testing is a great way to experiment with different pricing strategies to see what yields the best results.

Featured image

Step 6: Continuously Monitor and Adjust

Pricing should never be static. Market conditions, customer preferences, and business goals change over time. Continuously monitor:

  • Customer Feedback: Listen to how customers are responding to your pricing. Are they complaining? Are they willing to pay more for certain services?
  • Sales Data: Track how sales fluctuate when you adjust your pricing. Do certain price points lead to more sales or fewer?
  • Competitor Pricing: Stay on top of what your competitors are doing with their pricing. If there are changes in the market, be ready to adjust accordingly.

Regular adjustments will ensure that your pricing stays competitive and aligned with your goals.

Section 5: Tools to Help You Re-evaluate Your Pricing Structure

There are several tools you can use to streamline the process of re-evaluating and optimizing your pricing:

  • Pricing Software: Platforms like Price Intelligently or ProfitWell can help you analyze customer data and adjust pricing based on value.
  • Customer Surveys: Use tools like SurveyMonkey to gather customer feedback about pricing and perceived value.
  • Competitive Analysis Tools: Tools like SEMrush or SpyFu allow you to see what your competitors are offering and their pricing strategies.

These tools can save you time, help you make data-driven decisions, and avoid pricing mistakes.

Featured image

Conclusion: Setting Yourself Up for Long-Term Success

Re-evaluating your pricing structure is a crucial step toward building a more profitable business. Whether you’re adjusting prices to increase revenue, attract a more targeted customer base, or stay competitive in the market, a well-thought-out pricing strategy can lead to greater success in your fitness studio or wellness business.

Remember that your pricing should reflect the value you provide to customers and be adaptable to market changes. By continuously monitoring and adjusting your prices, you can ensure that your business remains profitable and sustainable in the long run.

Call to Action: Ready to re-evaluate your pricing structure? Start by analyzing your current pricing model, gathering customer feedback, and testing new strategies. The right pricing can make all the difference in achieving long-term business success.

Ultimate Guide to Creating a High-Converting Website for Fitness Studios

Ultimate Guide to Creating a High-Converting Website for Fitness Studios

A high-converting website is essential for fitness studios today. With so many clients searching online before committing to a fitness program, your website becomes the gateway to building trust, showcasing value, and driving memberships. But many fitness studios struggle to turn website visitors into paying clients due to common mistakes in design, navigation, and content.

In this guide, we’ll walk through the key elements of a high-converting fitness studio website and how to craft a site that resonates with your audience, builds your brand, and grows your client base.

1. Understanding the Problem: Why Many Fitness Studio Websites Struggle to Convert

Before diving into solutions, let’s look at some common reasons why fitness studio websites often fail to convert:

  • Confusing Navigation: Many fitness studio websites are difficult to navigate, leaving visitors lost.
  • Lack of Mobile Optimization: A large percentage of users browse on mobile, but some sites don’t adapt to different screen sizes.
  • Missing CTAs (Calls-to-Action): A call-to-action like “Join Now” or “Sign Up for a Free Class” encourages visitors to take the next step.
  • Outdated or Minimal Content: Visitors need to know what makes your studio unique and why they should choose you.

2. Solution: Key Elements of a High-Converting Fitness Studio Website

Let’s discuss the essential steps to create a website that not only attracts but also converts visitors into clients.

Step 1: Create a Welcoming and Brand-Aligned Homepage

The homepage is often the first interaction potential clients have with your studio. A welcoming, visually appealing homepage can set the tone for their experience.

Tips for a Great Homepage:

  • Clear Headline and Subheadline: Start with a headline that speaks directly to your audience, such as “Transform Your Health in a Community You’ll Love.”
  • Showcase Your Value Proposition: Use a short section on what sets your studio apart.
  • Feature Testimonials: Social proof is powerful; include testimonials from happy clients to build trust.
  • Add a Strong CTA: Buttons like “Book Your Free Class” or “See Our Class Schedule” should be easy to find and clickable.
Featured image

Step 2: Optimize for Mobile Users

With the majority of people using their phones to browse, a mobile-optimized site is no longer optional; it’s essential.

Mobile Optimization Tips:

  • Responsive Design: Ensure your site adapts to various screen sizes.
  • Speed Optimization: Fast-loading pages improve user experience and SEO ranking.
  • Simple Navigation: Keep menus minimal on mobile, and make buttons large enough to click with a finger.

Step 3: Prioritize High-Quality Visuals and Videos

The fitness industry relies heavily on visuals, so high-quality images and videos are essential.

Visual Content Tips:

  • Professional Photography: Use well-lit, high-resolution images of your studio, trainers, and clients.
  • Engaging Videos: Include short videos introducing the studio, showcasing classes, or explaining your approach.
  • Virtual Tours: A virtual tour can give potential clients an inside look, increasing their comfort level before they arrive.

Including visuals doesn’t just make your website look better—it helps with SEO. Properly labeled images with keywords like “Yoga Class for Beginners” or “Personal Training Studio Tour” can improve your visibility in search engines.

With the majority of people using their phones to browse, a mobile-optimized site is no longer optional; it’s essential.

Featured image

Step 4: Make Booking Simple with Clear Calls-to-Action

The primary goal of your website is to turn visitors into clients. That’s where CTAs come in. These should be strategically placed and encourage visitors to take the next step.

Effective CTA Tips:

  • Highlight Free Trials or Intro Classes: “Book Your First Class Free” is a powerful motivator for new clients.
  • Keep It Simple: Avoid lengthy forms; keep sign-ups or bookings short and user-friendly.
  • Repeat Key CTAs: Place your main CTA in multiple locations across your site, like the homepage, services page, and in a sticky header.

Including visuals doesn’t just make your website look better—it helps with SEO. Properly labeled images with keywords like “Yoga Class for Beginners” or “Personal Training Studio Tour” can improve your visibility in search engines.

With the majority of people using their phones to browse, a mobile-optimized site is no longer optional; it’s essential.

Step 5: Create a Detailed, Engaging “About Us” Page

Your “About Us” page helps build trust by letting visitors know who you are and why you’re passionate about fitness. Personalizing this section can set your studio apart.

About Us Page Tips:

  • Tell Your Story: Share how your studio started, your mission, and what drives your team.
  • Introduce Your Team: Include photos and bios of instructors to create a personal connection.
  • Showcase Studio Values: Outline what you stand for, like inclusivity, community, or expertise.
Featured image

Step 6: Highlight Services and Membership Options

Potential clients want to know exactly what you offer and what each membership includes. Make this information accessible and easy to understand.

Service Page Tips:

  • Separate Services into Categories: Divide services like “Yoga Classes,” “Personal Training,” and “Group Workouts” into different sections.
  • List Membership Benefits: Emphasize unique perks like “Access to All Classes,” “One Free Personal Training Session,” or “Discounts on Retail Products.”
  • Pricing Transparency: If possible, include membership costs directly on your website. Transparent pricing can be a deciding factor.

Step 7: Add Testimonials and Case Studies

Testimonials from happy clients can significantly boost your credibility. People trust other people’s opinions, so testimonials can be persuasive.

Tips for Effective Testimonials:

  • Feature Diverse Testimonials: Include a mix of new clients, regulars, and those who achieved specific goals.
  • Use Visuals: Whenever possible, add a picture of the person giving the testimonial.
  • Add Case Studies: Share detailed stories of client transformations or milestones to inspire prospective clients.
Featured image

Step 8: Implement SEO Best Practices

To drive organic traffic, optimize your website with SEO strategies so your fitness studio ranks well in search engine results.

SEO Tips for Fitness Studios:

  • Keyword Research: Use keywords like “best fitness studio in [location],” “yoga classes,” or “personal training.”
  • On-Page SEO: Include keywords naturally in your headings, content, and image alt tags.
  • Blogging: Regularly posting blogs can help improve your SEO. Write about topics your audience is interested in, like “Fitness Tips for Beginners” or “How to Prepare for a Spin Class.”

Step 9: Use Analytics to Continuously Improve

Once your website is live, tracking performance with tools like Google Analytics can help you identify what works and where you can improve.

Analytics Tips:

  • Monitor Bounce Rate: A high bounce rate could mean visitors aren’t finding what they need.
  • Track Conversions: Set up goals in Google Analytics to track when visitors book a class, sign up, or contact you.
  • Adjust Based on Insights: Regularly review your analytics and make adjustments, like improving page load times or reworking CTAs.

Conclusion

A high-converting website isn’t just about aesthetics—it’s about creating a seamless, valuable experience for visitors. By following these steps, you’ll not only attract more clients but also convert them into long-term members who feel connected to your studio.

Your website is one of the most valuable assets in your fitness studio’s marketing toolkit. Taking the time to enhance navigation, optimize for mobile, add compelling CTAs, and implement SEO strategies will help you build a powerful digital presence that resonates with your audience and grows your business.

Essential Brand Assets: 6 Must-Haves to Successfully Market Your Studio Online

Essential Brand Assets: 6 Must-Haves to Successfully Market Your Studio Online

In today’s digital age, creating a memorable and professional online presence is crucial for studios in the fitness, wellness, and lifestyle industries. But with the many options available, building a brand that truly stands out can feel overwhelming. By focusing on essential brand assets, studios can create an impactful toolkit that boosts their marketing success and attracts more clients.

In this blog, we’ll explore six essential brand assets that every studio owner needs to market their business effectively online. We’ll look at why each asset is important and how to leverage them for maximum impact.

Why a Strong Brand Presence is Essential for Studios

With more people turning to the internet to find classes, services, and studios that fit their needs, a strong brand presence has become essential for attracting and retaining clients. A cohesive brand doesn’t just look good; it communicates who you are, what you offer, and why clients should choose you.

Problem: Many studio owners struggle with creating a consistent and effective online brand presence.

Solution: By focusing on these six brand assets, you can build an engaging, professional brand that makes a lasting impression.

1. A Unique and Memorable Logo

Your logo is the cornerstone of your brand identity. It’s often the first thing clients will notice, and it should represent your studio’s personality and values. An effective logo is simple, recognizable, and scalable.

  • Why It Matters: A strong logo helps establish brand recognition and conveys professionalism. When clients see your logo consistently across platforms, it builds trust and familiarity.
  • Tips for Creating Your Logo: Work with a professional designer who understands your vision or use design tools that provide logo templates. Keep it simple and choose colors that resonate with your studio’s vibe.
Featured image

2. Consistent Brand Colors and Fonts

Consistency is key to making your brand look polished and professional. Brand colors and fonts set the visual tone and make your brand recognizable.

  • Why It Matters: Colors and fonts help convey the mood and personality of your studio. Consistent use across digital platforms makes your studio look cohesive and easy to recognize.
  • Choosing Colors and Fonts: Stick to 2-3 main colors that reflect your brand’s energy (e.g., calming blues for yoga studios or vibrant reds for fitness studios). For fonts, choose a primary font for headers and a secondary one for body text.

3. Engaging Social Media Graphics and Templates

Social media is a powerful tool for reaching new clients and building community with existing ones. To maintain a polished presence, use branded graphics and templates that align with your studio’s aesthetic.

  • Why It Matters: Well-designed graphics help increase engagement and establish a consistent look across your social media posts.
  • Creating Social Media Assets: Use design tools like Canva or Adobe Spark to create branded templates for quotes, announcements, class schedules, and events. This consistency will make your posts instantly recognizable.
Featured image

4. High-Quality Photos and Videos

In an industry as visual as fitness and wellness, professional photos and videos are essential. These assets showcase your studio’s atmosphere, classes, and community, allowing potential clients to imagine themselves in your space.

  • Why It Matters: Visual content is more engaging than text alone, making it ideal for marketing on social media and your website. It also helps clients connect with your studio on a personal level.
  • Creating Effective Visual Content: Hire a photographer to capture high-quality images of your studio, staff, and classes. For videos, consider short clips that highlight classes, events, or success stories from members.

5. Branded Email Templates

Email marketing is one of the most effective ways to communicate with clients and keep them engaged. Branded email templates make your messages look professional and reinforce your studio’s brand.

  • Why It Matters: Consistent branding in emails helps build recognition and keeps your messages aligned with your studio’s look and feel.
  • Tips for Branded Emails: Create templates for newsletters, promotions, and class reminders using your studio’s colors and fonts. Include your logo at the top, and keep the layout simple for easy reading.
Featured image

6. Compelling Website Copy

The words you use on your website play a huge role in establishing your brand’s voice and message. Well-crafted, engaging copy explains your studio’s benefits, services, and values to prospective clients.

  • Why It Matters: Clear, persuasive copy helps clients understand what makes your studio special and why they should sign up for classes. It also improves your SEO, making your website easier to find.
  • Creating Effective Copy: Focus on your studio’s unique selling points and address common client questions. Avoid jargon and keep sentences short and engaging. Use keywords that will help your website appear in relevant searches.

Tips for Building and Using Your Brand Assets Effectively

Once you have these assets, it’s important to use them strategically to maximize their impact. Here are a few tips:

  • Maintain Consistency: Consistent use of colors, fonts, and voice across all platforms will make your studio more memorable.
  • Invest in Quality: Professional-looking assets (especially photos and videos) elevate your brand and make a positive first impression.
  • Regularly Update Visual Content: Keep your visuals fresh by adding seasonal photos or updating your templates for different promotions.

Conclusion

Building a successful studio brand online is all about presenting a cohesive, engaging identity that resonates with potential clients. By creating and consistently using these six essential brand assets, you’ll make your studio stand out in a crowded market, increase brand loyalty, and drive new client sign-ups.

  • Key Takeaways:

  1. Start with a unique logo that captures your studio’s identity.
  2. Use consistent brand colors and fonts to create a recognizable look.
  3. Invest in high-quality photos and videos to showcase your studio.
  4. Design branded social media graphics to increase engagement.
  5. Use email templates to strengthen communication with clients.
  6. Write compelling website copy that highlights your unique value.

Building a standout brand online requires careful planning and consistent effort, but the results are well worth it. With these essential brand assets, you’re well-equipped to make a lasting impact and grow your studio’s online presence.

By focusing on these essential steps, you’ll create a brand that not only attracts new clients but also builds long-lasting connections with your current members.

Seamlessly Integrate MindBody with Squarespace: Your Complete Guide

Seamlessly Integrate MindBody with Squarespace: Your Complete Guide

In today’s digital world, fitness and wellness studios rely on websites that simplify client engagement and streamline booking processes. For many, MindBody is the go-to for managing class schedules, client information, and payments. Meanwhile, Squarespace offers intuitive, customizable website solutions that help businesses stand out online. Integrating these two platforms can significantly enhance the user experience, simplify operations, and even boost client retention.

This comprehensive guide covers everything you need to know to seamlessly integrate MindBody with Squarespace, allowing you to leverage both platforms’ strengths to create an efficient, client-friendly online experience.

Why Integrate MindBody with Squarespace?

Before diving into the “how,” let’s briefly explore why integrating MindBody with Squarespace is valuable.

Problem: Many fitness and wellness businesses struggle with fragmented tools for managing bookings, schedules, and client communications. This can lead to an inefficient user experience and create additional work for staff.

Solution: By integrating MindBody with Squarespace, you can offer a smooth, all-in-one experience for clients looking to book appointments, classes, or sessions online. This can reduce client friction, boost engagement, and free up time for your team to focus on core tasks like client care and business development.

1. Key Benefits of Integrating MindBody and Squarespace

Enhanced Client Experience
With a MindBody and Squarespace integration, clients can book, pay, and manage their classes directly from your website without needing to navigate multiple platforms. This streamlined experience makes clients more likely to follow through with their bookings and return to your site in the future.

Efficient Management
An integrated setup means your team can more easily manage schedules, classes, and client data in one place. With synced information, updates are automatically reflected across both platforms, so you’re always working with the latest data.

Increased Visibility and Brand Cohesion
A seamless experience across booking and your website improves brand cohesion, which can be valuable for both first impressions and long-term brand loyalty. Clients will feel your brand’s professionalism and ease of use, which helps to build trust.

Featured image

2. Prerequisites for Integrating MindBody with Squarespace

Before beginning the integration process, ensure you have the following:

  • An Active MindBody Account
    Ensure your MindBody subscription includes the necessary features for API access or integration tools (usually available with MindBody’s higher-tier plans).

  • A Squarespace Website
    If you don’t have a Squarespace website yet, consider which template and features best fit your business. Squarespace has templates suited for fitness and wellness brands, so explore these options before you start.

3. Customizing the Integration for a Cohesive Brand Experience

To make the most of your integration, ensure it aligns with your website’s design and functionality.

Match Branding
Customize your MindBody widget colors, fonts, and layout to match your brand’s design on Squarespace. Consistency helps create a cohesive experience and reassures clients they’re in the right place.

Optimize User Navigation
Consider placing the booking widget or schedule in a visible location, such as the homepage or navigation menu. This makes it easy for clients to find what they’re looking for without unnecessary scrolling or searching.

Featured image

4. How to Integrate MindBody with Squarespace: Step-by-Step

Step 1: Enable API Access in MindBody

MindBody uses APIs (Application Programming Interfaces) to communicate with other software. API access allows your website to pull information directly from your MindBody account, such as available classes, instructor bios, and booking options.

  1. Log into MindBody and navigate to the API section within the settings.
  2. Enable API Access or reach out to MindBody support if you need assistance with access.

Note: MindBody may require approval for API usage, so complete any necessary forms to ensure seamless connectivity.

Step 2: Choose an Integration Option

Squarespace offers several ways to integrate with MindBody. Below are two common approaches:

Option A: Use a Third-Party Integration Tool

There are tools like Zapier and Schedulicity that act as a bridge between MindBody and Squarespace. Here’s how they work:

  1. Create an account on your chosen integration platform.
  2. Connect both MindBody and Squarespace to your integration tool by providing your login details and authorizing API access.
  3. Configure actions such as “when a new class is scheduled on MindBody, add it to my Squarespace calendar.”

Option B: Embed MindBody Widgets

MindBody provides customizable widgets that can be embedded into your Squarespace site:

  1. Log into MindBody and go to the Widgets section.
  2. Select the desired widget, such as “Class Schedule” or “Booking Widget,” and customize it to fit your branding.
  3. Copy the widget code and paste it into the code block on your Squarespace page.

Widgets are particularly useful if you want a simple, code-free integration option.

5. Addressing Common Integration Challenges

Integration can sometimes come with its share of issues. Here’s how to solve some of the most common ones:

Display and Formatting Issues
If your widget isn’t displaying correctly on Squarespace, check the code block settings and ensure you’ve copied the code accurately. Adjusting your site’s CSS can also help with minor display tweaks.

API Connection Failures
API connections can sometimes disconnect. Regularly check your MindBody and Squarespace accounts to ensure the link is functioning. If you encounter issues, reconnect the APIs or reach out to support.

Featured image

6. Tips to Optimize Your Integrated Setup for Better Engagement

Once your integration is in place, there are several ways to improve it for client engagement and search engine optimization (SEO):

Optimize Page Titles and Meta Descriptions
When integrating your booking page on Squarespace, include a relevant page title and meta description to help clients find your site through search engines. For example:

  • Title: “Book Your Next Fitness Class | [Your Studio Name]”
  • Meta Description: “Easily book fitness classes online with [Your Studio Name]. View schedules and reserve your spot today!”

Leverage Customer Reviews
If you use MindBody’s review feature, display recent positive reviews on your Squarespace homepage. Social proof helps increase trust and can boost booking rates.

Implement Analytics
Track your booking page’s performance using Google Analytics or Squarespace’s built-in analytics tools. Monitoring page views, conversions, and bounce rates can reveal where clients drop off in the booking process, helping you optimize.

7. Final Checklist for a Seamless Integration

Before you go live, here’s a final checklist to ensure everything is ready:

  • Test the Widgets and API
    Run through the booking process as if you were a client to ensure everything works smoothly.

  • Review Mobile Responsiveness
    Test your integration on mobile devices, as many clients will likely book from their phones.

  • Set Up Customer Support
    Make it easy for clients to reach out if they have booking issues. Include a contact form or live chat option for immediate support.

Conclusion

Integrating MindBody with Squarespace offers a powerful solution for wellness and fitness businesses looking to improve the client experience and streamline operations. From easier booking to brand cohesion, a seamless integration allows clients to engage with your brand effortlessly.

Setting up your integration may take a bit of initial work, but the benefits in client satisfaction and operational efficiency make it worthwhile. With this guide, you’re equipped to successfully connect MindBody and Squarespace and set your studio up for success.

By following this complete guide, your fitness or wellness studio can confidently integrate MindBody with Squarespace and take client convenience and business efficiency to the next level.

Boost Bookings: Add a ‘Join Waitlist’ Button to Your Mindbody Schedule Easily

Boost Bookings: Add a ‘Join Waitlist’ Button to Your Mindbody Schedule Easily

Adding a “Join Waitlist” button to your Mindbody schedule can be a game-changer for fitness studios, wellness centers, and other appointment-based businesses. High-demand classes and limited spots often leave clients disappointed when they can’t reserve a spot. But by incorporating a waitlist option, you’re allowing clients to stay engaged with your offerings, even when a class is full. This small addition can make a significant difference in customer satisfaction and in filling up classes to their maximum potential.

In this guide, we’ll walk through why a waitlist option matters, how it can benefit your business, and how to add this feature to your Mindbody schedule seamlessly.

Why a “Join Waitlist” Button is Essential

The demand for popular classes is often high, and with limited spots, a waitlist option is essential for several reasons:

  1. Maximizing Class Attendance: No-shows happen, but when you have a waitlist, it’s easy to fill those empty spots with clients who are ready to join.
  2. Improving Client Retention: Instead of turning away clients, you give them an option to get a spot, improving their experience and making them more likely to return.
  3. Building Excitement: A waitlist feature can create a sense of exclusivity and urgency, encouraging clients to register for classes in advance.

Step 1: Set Up Your Mindbody Account

Before you can add a “Join Waitlist” button to your schedule, ensure that your Mindbody account is properly set up. If you’re new to Mindbody, follow these quick steps:

  • Sign up for a Mindbody account if you don’t already have one.
  • Complete the business setup with details about your classes, sessions, and instructors.
  • Customize your schedule and add your regular classes, times, and capacity limits.

For detailed guidance on setting up a Mindbody account, refer to their official support page here.

Featured image

Step 2: Enable Waitlist in Mindbody

Once your account is set up and your classes are scheduled, the next step is to enable the waitlist function:

  1. Navigate to the Settings: Log in to your Mindbody dashboard, go to the “Manager Tools” or “Business Settings” depending on your plan.
  2. Select the Waitlist Option: In the “Class Settings” or “Appointments,” locate the waitlist settings.
  3. Enable Waitlist: Choose the class or appointment types for which you’d like to enable the waitlist option. Set the maximum number of waitlist spots to match your business needs.

Each Mindbody plan may differ slightly, so consult the Mindbody Help Center if you need specific guidance.

Step 3: Customize the Waitlist Button

Creating a custom, eye-catching waitlist button on your website will help your clients quickly identify how to join the list. Here’s how to set it up effectively:

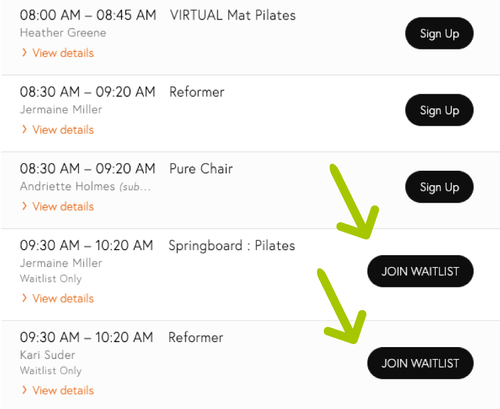
  • Label the Button Clearly: Use an action-oriented label like “Join the Waitlist” or “Sign Up for Waitlist.”
  • Add a Description: Let clients know they’ll be notified if a spot becomes available and that they’ll have the option to book quickly.
  • Use Eye-Catching Design: Consider a button color that stands out on your site, with bold text and a recognizable placement near your schedule.

Adding the Button to Your Schedule Page

  1. Embed Mindbody’s Schedule Widget: Most Mindbody users add their schedule to their website through the Mindbody widget.
  2. Adjust the Widget Settings: Go into your widget settings on the Mindbody dashboard and enable the waitlist button to display next to each class.
  3. Test the Integration: Open your website and test the button to ensure clients can see it and join the waitlist without issues.
Featured image

Step 4: Notify Clients When Spots Open Up

A waitlist system is only effective if clients know when a spot opens up. Mindbody offers automated notifications, but you’ll need to ensure they’re set up correctly:

  • Enable Waitlist Notifications: In your notification settings, activate the automatic email or text alerts for clients who are on the waitlist.
  • Personalize the Message: Customize the notification to explain that a spot has become available, along with a link to confirm their booking. A personalized message can create a better experience and drive engagement.
  • Set a Time Limit for Confirmation: Giving clients a specific timeframe, such as 12 hours, to confirm their spot encourages quick responses and ensures the class reaches capacity.

Step 5: Monitor and Optimize Your Waitlist

Once your “Join Waitlist” button is active, monitoring its performance and optimizing as needed is crucial for success:

  • Track Waitlist Usage: Keep an eye on how many clients are joining the waitlist, and note any classes that frequently have waitlists. This data can help you understand demand and potentially add more sessions.
  • Adjust Class Capacities if Needed: If a class consistently has a long waitlist, consider adjusting the room or space to allow a few more clients if possible.
  • Gather Client Feedback: Ask clients about their waitlist experience, whether they receive notifications in a timely manner, and if the process is smooth.
Featured image

Troubleshooting Common Issues

  • Problem: Waitlist Button Not Showing
    Solution: Check the widget settings on Mindbody to ensure the waitlist option is enabled. Sometimes, a quick refresh or re-embedding the widget code can fix this.

  • Problem: Clients Not Receiving Notifications
    Solution: Verify that client notification settings are active and that emails or texts are configured correctly in the “Settings” area of your Mindbody dashboard.

  • Problem: High Drop-Off Rate on Waitlist
    Solution: If clients are joining the waitlist but not booking when notified, consider adjusting your communication. A friendly reminder or a limited booking window can increase responses.

Benefits of Adding a Waitlist Button to Your Mindbody Schedule

Adding a waitlist option isn’t just a backup plan; it can actively improve your business operations and client engagement:

  1. More Efficient Class Management: You can better manage attendance by filling spots that would otherwise remain vacant.
  2. Improved Customer Experience: Clients who may have missed out on a class still feel valued and included.
  3. Enhanced Revenue Potential: Full classes mean maximum revenue, and waitlists help you achieve that even with limited class sizes.

Additional Tips to Maximize Waitlist Effectiveness

Here are a few bonus tips to help you make the most out of your waitlist feature:

  • Encourage Early Registration: Remind clients to book early, especially for high-demand classes, so they avoid the waitlist altogether.
  • Promote the Waitlist: Advertise the waitlist feature on your social media and website, so clients know it’s an option if they can’t get an immediate spot.
  • Offer Waitlist Priority to Members: If you have a membership system, consider giving members priority access to waitlists, which can be a great membership perk.

Final Thoughts: Make Every Spot Count with a Waitlist Feature

Adding a “Join Waitlist” button to your Mindbody schedule is a simple way to boost bookings and ensure your classes reach full capacity. By setting it up carefully, testing for functionality, and optimizing based on feedback, you’ll be able to serve your clients better while maximizing class attendance.

Whether you’re a fitness studio or a wellness center, this small adjustment can lead to big changes in client satisfaction and overall revenue. Ready to get started? Follow the steps in this guide, and soon you’ll have a seamless waitlist system in place that keeps your clients coming back, even when classes are full!

Adding internal links to your website, like those that refer back to other relevant articles, is an effective SEO strategy. Don’t forget to revisit this setup every few months to ensure your waitlist system continues meeting your clients’ needs effectively.