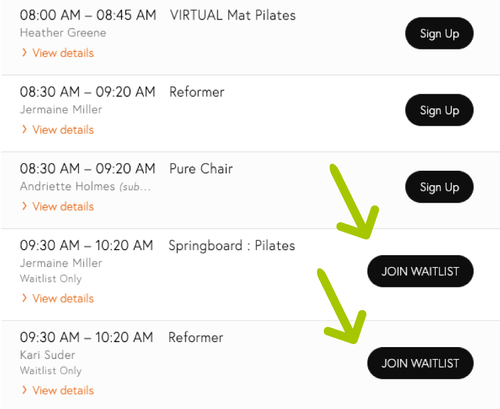
Adding a “Join Waitlist” button to your Mindbody schedule can be a game-changer for fitness studios, wellness centers, and other appointment-based businesses. High-demand classes and limited spots often leave clients disappointed when they can’t reserve a spot. But by incorporating a waitlist option, you’re allowing clients to stay engaged with your offerings, even when a class is full. This small addition can make a significant difference in customer satisfaction and in filling up classes to their maximum potential.
In this guide, we’ll walk through why a waitlist option matters, how it can benefit your business, and how to add this feature to your Mindbody schedule seamlessly.
Why a “Join Waitlist” Button is Essential
The demand for popular classes is often high, and with limited spots, a waitlist option is essential for several reasons:
- Maximizing Class Attendance: No-shows happen, but when you have a waitlist, it’s easy to fill those empty spots with clients who are ready to join.
- Improving Client Retention: Instead of turning away clients, you give them an option to get a spot, improving their experience and making them more likely to return.
- Building Excitement: A waitlist feature can create a sense of exclusivity and urgency, encouraging clients to register for classes in advance.
Step 1: Set Up Your Mindbody Account
Before you can add a “Join Waitlist” button to your schedule, ensure that your Mindbody account is properly set up. If you’re new to Mindbody, follow these quick steps:
- Sign up for a Mindbody account if you don’t already have one.
- Complete the business setup with details about your classes, sessions, and instructors.
- Customize your schedule and add your regular classes, times, and capacity limits.
For detailed guidance on setting up a Mindbody account, refer to their official support page here.

Step 2: Enable Waitlist in Mindbody
Once your account is set up and your classes are scheduled, the next step is to enable the waitlist function:
- Navigate to the Settings: Log in to your Mindbody dashboard, go to the “Manager Tools” or “Business Settings” depending on your plan.
- Select the Waitlist Option: In the “Class Settings” or “Appointments,” locate the waitlist settings.
- Enable Waitlist: Choose the class or appointment types for which you’d like to enable the waitlist option. Set the maximum number of waitlist spots to match your business needs.
Each Mindbody plan may differ slightly, so consult the Mindbody Help Center if you need specific guidance.
Step 3: Customize the Waitlist Button
Creating a custom, eye-catching waitlist button on your website will help your clients quickly identify how to join the list. Here’s how to set it up effectively:
- Label the Button Clearly: Use an action-oriented label like “Join the Waitlist” or “Sign Up for Waitlist.”
- Add a Description: Let clients know they’ll be notified if a spot becomes available and that they’ll have the option to book quickly.
- Use Eye-Catching Design: Consider a button color that stands out on your site, with bold text and a recognizable placement near your schedule.
Adding the Button to Your Schedule Page
- Embed Mindbody’s Schedule Widget: Most Mindbody users add their schedule to their website through the Mindbody widget.
- Adjust the Widget Settings: Go into your widget settings on the Mindbody dashboard and enable the waitlist button to display next to each class.
- Test the Integration: Open your website and test the button to ensure clients can see it and join the waitlist without issues.

Step 4: Notify Clients When Spots Open Up
A waitlist system is only effective if clients know when a spot opens up. Mindbody offers automated notifications, but you’ll need to ensure they’re set up correctly:
- Enable Waitlist Notifications: In your notification settings, activate the automatic email or text alerts for clients who are on the waitlist.
- Personalize the Message: Customize the notification to explain that a spot has become available, along with a link to confirm their booking. A personalized message can create a better experience and drive engagement.
- Set a Time Limit for Confirmation: Giving clients a specific timeframe, such as 12 hours, to confirm their spot encourages quick responses and ensures the class reaches capacity.
Step 5: Monitor and Optimize Your Waitlist
Once your “Join Waitlist” button is active, monitoring its performance and optimizing as needed is crucial for success:
- Track Waitlist Usage: Keep an eye on how many clients are joining the waitlist, and note any classes that frequently have waitlists. This data can help you understand demand and potentially add more sessions.
- Adjust Class Capacities if Needed: If a class consistently has a long waitlist, consider adjusting the room or space to allow a few more clients if possible.
- Gather Client Feedback: Ask clients about their waitlist experience, whether they receive notifications in a timely manner, and if the process is smooth.

Troubleshooting Common Issues
-
Problem: Waitlist Button Not Showing
Solution: Check the widget settings on Mindbody to ensure the waitlist option is enabled. Sometimes, a quick refresh or re-embedding the widget code can fix this. -
Problem: Clients Not Receiving Notifications
Solution: Verify that client notification settings are active and that emails or texts are configured correctly in the “Settings” area of your Mindbody dashboard. -
Problem: High Drop-Off Rate on Waitlist
Solution: If clients are joining the waitlist but not booking when notified, consider adjusting your communication. A friendly reminder or a limited booking window can increase responses.
Benefits of Adding a Waitlist Button to Your Mindbody Schedule
Adding a waitlist option isn’t just a backup plan; it can actively improve your business operations and client engagement:
- More Efficient Class Management: You can better manage attendance by filling spots that would otherwise remain vacant.
- Improved Customer Experience: Clients who may have missed out on a class still feel valued and included.
- Enhanced Revenue Potential: Full classes mean maximum revenue, and waitlists help you achieve that even with limited class sizes.
Additional Tips to Maximize Waitlist Effectiveness
Here are a few bonus tips to help you make the most out of your waitlist feature:
- Encourage Early Registration: Remind clients to book early, especially for high-demand classes, so they avoid the waitlist altogether.
- Promote the Waitlist: Advertise the waitlist feature on your social media and website, so clients know it’s an option if they can’t get an immediate spot.
- Offer Waitlist Priority to Members: If you have a membership system, consider giving members priority access to waitlists, which can be a great membership perk.
Final Thoughts: Make Every Spot Count with a Waitlist Feature
Adding a “Join Waitlist” button to your Mindbody schedule is a simple way to boost bookings and ensure your classes reach full capacity. By setting it up carefully, testing for functionality, and optimizing based on feedback, you’ll be able to serve your clients better while maximizing class attendance.
Whether you’re a fitness studio or a wellness center, this small adjustment can lead to big changes in client satisfaction and overall revenue. Ready to get started? Follow the steps in this guide, and soon you’ll have a seamless waitlist system in place that keeps your clients coming back, even when classes are full!


